Tuesday, December 13, 2022

How to Prevent a Directory Listing of Your Website with .htaccess

Here is the article.

How to Prevent a Directory Listing of Your Website with .htaccess

by Christopher Heng, thesitewizard.com

If you create a new directory (or folder) on your website, and do not put an "index.html" file in it, you may be surprised to find that your visitors can get a directory listing of all the files in that folder. For example, if you create a folder called "incoming", you can see everything in that directory simply by typing "http://www.example.com/incoming/" in your browser. No password or anything is needed.

This article shows you how you can configure your web server so that it does not show a directory listing by default.

Prerequisites

  • Your Website Must Be on an Apache Web Server

    For the method described in this article to work, your site should be hosted on an Apache web server. This probably constitutes the majority of websites on the Internet, so it is likely that you satisfy this requirement. In general, if your web server (the computer that your site is running on) is using Linux or FreeBSD, chances are that it's on an Apache server. If your server is using Windows, your website is probably not using Apache. All is not lost, though. You can still accomplish the same thing using a different method. Read How to Prevent a Directory Listing of Your Website Without Using .htaccess instead.

    (Note that I'm talking about the computer hosting your website, not your own personal computer. If you're not sure what type of server your site is on, ask your web host.)

  • Your Web Host Must Have Enabled .htaccess Server Overrides

    In addition to being hosted on an Apache web server, your web host needs to have enabled server overrides. This facility allows you to modify the web server configuration from your own website. In practice, this usually means that your website is hosted on a commercial web host rather than a free one. Free web hosts normally don't allow websites hosted on them to change the web server behaviour.

Both the above conditions must be true, or you won't be able to successfully do the things mentioned in this guide.

Is Protecting Your Directory Listing From View a Security Measure?

Protecting your directories from being listed by your website's visitors does not, in and of itself, make your website more secure. At best, it's security by obscurity. That is, you hope that by hiding stuff from view, nefarious visitors up to no good will not be able to easily list all your files with a single request. It doesn't stop them from directly accessing those files by name.

However, while you should of course implement other measures for securing your site, it's still good practice not to allow your directories to be listed by default. That way, at least, you don't make it too easy for others to survey your site for vulnerabilities. This is especially so if you have third-party scripts on your site (such as, for example, you run a blog).

It's important to realise this, so that you don't rely on this method alone for security.

Steps to Preventing a Directory Listing

  1. Get Your Existing .htaccess File, If Any

    Connect to your website using an FTP or SFTP software. Go to the top web directory of your site, where you place your home page, and look for a file called ".htaccess". If it exists, download it to your computer.

    If it does not exist, make sure that it is not hidden from your view. This has to be done from within your FTP program itself. Depending on which program you use, you may need to look for a setting that says something like "show hidden files". In one program, namely FileZilla, you may have to enable the "Force showing hidden files" line in the Server menu, although in my experience, the program shows it by default.

    Another way to do this is to log into your site from your web host's control panel. Most, if not all, commercial web hosts provide a way for you to view your web directories from your web browser, as well as upload and download files from them. If your web host has an option to "show hidden files" or some such thing, make sure you enable it. From your host's web interface, you should be able to locate and download your existing .htaccess file.

    Don't worry if, after all your efforts, you can't find any .htaccess file in the main web directory. It's quite normal for a website not to have one. You'll just have to create a blank one later. However, if one exists, it's important that you get it, so that we can add to the settings in the file instead of overwriting them.

  2. Make a Backup of the .htaccess File

    If you managed to find and download the .htaccess file from your site, save a backup copy on your own computer. That is, make sure you have 2 copies of the .htaccess file on your computer, the one you are about to modify, and a pristine copy of the original. The backup is useful in case you accidentally make an error later.

  3. Create or Open the .htaccess File

    If you've managed to get the .htaccess file, open it in a plain text editor (eg an ASCII text editor) such as Notepad (for Windows users), and scroll to put your text cursor at the end of the file, on a blank line. If one does not exist, use the editor to create a new blank document. The rest of this article will assume that you have already started the editor with the .htaccess open or with a blank document if no .htaccess file previously existed.

    WARNING: do not use a wordprocessor like Word, Office, or WordPad to create or edit your .htaccess file. You should also not use a WYSIWYG (What-You-See-Is-What-You-Get) web editor for this purpose. If you do either of these things, your site will mysteriously fail to work when you upload the file to your web server. This is very important. There are no exceptions.

  4. Disable Indexing

    Add the following line to your .htaccess file.

    Options -Indexes

    Make sure you hit the ENTER key (or RETURN key if you use a Mac) after entering the "Options -Indexes" words so that the file ends with a blank line.

  5. Saving and Uploading the File

    Once you're done with disabling the directory listing in the .htaccess file, save the file. If your file is a new one, and you're using Notepad, make sure you save it as ".htaccess", quotes and all. If you don't add the quotes, Notepad will add a .txt extension to your filename without telling you. Also, make sure the filename itself is exactly .htaccess, that is, the name starts with a full stop ("period" if you use US English), and is entirely in small letters (lowercase). No other name is acceptable.

    Then upload the file to your web server using an FTP/SFTP program (or with your web host's control panel). If you did not use an FTP program in the earlier step (for example, you used your web host's control panel instead), and don't know how to do so, check out my tutorial on How to Upload a File to Your Website Using the FileZilla FTP Client.

  6. Test Your Site

    Whenever you modify your .htaccess file, you should always check that your website still works after uploading it. I'm not kidding here. The .htaccess controls everything the server does with your site. A slight error can render your entire website unusable. So when I say test your website, you should test not only that a directory without "index.html" can no longer be listed, but also check your main page and a few other pages to make sure that they still load.

    If anything goes wrong, delete the .htaccess file on your website and your site should work again. For those who had an existing .htaccess on the site before, upload the backup copy to the site.

Conclusion

If all goes well, you should get a "Forbidden" error when you try to access a directory that doesn't have an index file.

PHP Security Guide: Databases and SQL

 Here is the article.

PHP Security Guide: Databases and SQL

Exposed Access Credentials

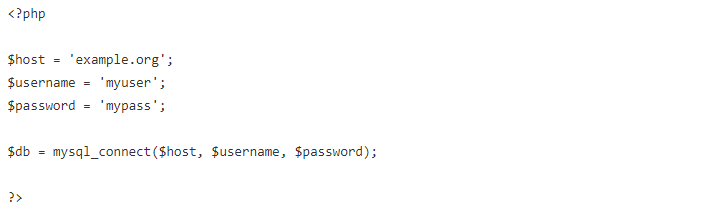
Most PHP applications interact with a database. This usually involves connecting to a database server and using access credentials to authenticate:

This could be an example of a file called db.inc that is included whenever a connection to the database is needed. This approach is convenient, and it keeps the access credentials in a single file.

Potential problems arise when this file is somewhere within document root. This is a common approach, because it makes include and require statements much simpler, but it can lead to situations that expose your access credentials.

Remember that everything within document root has a URL associated with it. For example, if document root is /usr/local/apache/htdocs, then a file located at /usr/local/apache/htdocs/inc/db.inc has a URL such as http://example.org/inc/db.inc.

Combine this with the fact that most web servers will serve .inc files as plaintext, and the risk of exposing your access credentials should be clear. A bigger problem is that any source code in these modules can be exposed, but access credentials are particularly sensitive.

Of course, one simple solution is to place all modules outside of document root, and this is a good practice. Both include and require can accept a filesystem path, so there’s no need to make modules accessible via URL. It is an unnecessary risk.

If you have no choice in the placement of your modules, and they must be within document root, you can put something like the following in your httpd.conf file (assuming Apache):

<Files ~ “\.inc$”>
Order allow,deny
Deny from all
</Files>

It is not a good idea to have your modules processed by the PHP engine. This includes renaming your modules with a .php extension as well as using AddType to have .inc files treated as PHP files. Executing code out of context can be very dangerous, because it’s unexpected and can lead to unknown results. However, if your modules consist of only variable assignments (as an example), this particular risk is mitigated.

My favorite method for protecting your database access credentials is described in the PHP Cookbook (O’Reilly) by David Sklar and Adam Trachtenberg. Create a file, /path/to/secret-stuff, that only root can read (not nobody):

SetEnv DB_USER “myuser”
SetEnv DB_PASS “mypass”
Include this file within httpd.conf as follows:

Include “/path/to/secret-stuff”
Now you can use $_SERVER[‘DB_USER’] and $_SERVER[‘DB_PASS’] in your code. Not only do you never have to write your username and password in any of your scripts, the web server can’t read the secret-stuff file, so no other users can write scripts to read your access credentials (regardless of language). Just be careful not to expose these variables with something like phpinfo() or print_r($_SERVER).

SQL Injection

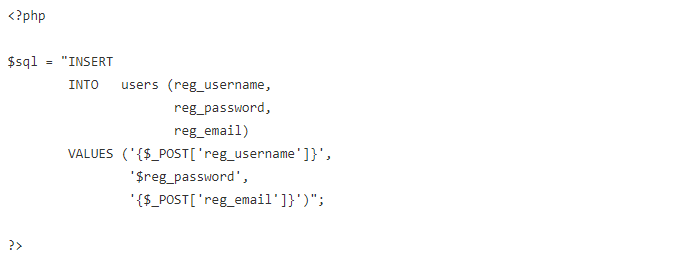
SQL injection attacks are extremely simple to defend against, but many applications are still vulnerable. Consider the following SQL statement:

This query is constructed with $_POST, which should immediately look suspicious.

Assume that this query is creating a new account. The user provides a desired username and an email address. The registration application generates a temporary password and emails it to the user to verify the email address. Imagine that the user enters the following as a username:

bad_guy’, ‘mypass’, ”), (‘good_guy
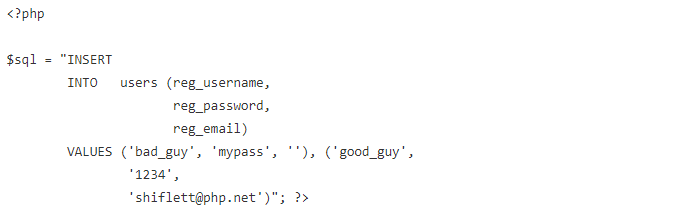
This certainly doesn’t look like a valid username, but with no data filtering in place, the application can’t tell. If a valid email address is given (shiflett@php.net, for example), and 1234 is what the application generates for the password, the SQL statement becomes the following:

Rather than the intended action of creating a single account (good_guy) with a valid email address, the application has been tricked into creating two accounts, and the user supplied every detail of the bad_guy account.

While this particular example might not seem so harmful, it should be clear that worse things could happen once an attacker can make modifications to your SQL statements.

For example, depending on the database you are using, it might be possible to send multiple queries to the database server in a single call. Thus, a user can potentially terminate the existing query with a semicolon and follow this with a query of the user’s choosing.

MySQL, until recently, does not allow multiple queries, so this particular risk is mitigated. Newer versions of MySQL allow multiple queries, but the corresponding PHP extension (ext/mysqli) requires that you use a separate function if you want to send multiple queries (mysqli_multi_query() instead of mysqli_query()). Only allowing a single query is safer, because it limits what an attacker can potentially do.

Protecting against SQL injection is easy:

  • Filter your data. This cannot be overstressed. With good data filtering in place, most security concerns are mitigated, and some are practically eliminated.
  • Quote your data. If your database allows it (MySQL does), put single quotes around all values in your SQL statements, regardless of the data type.
  • Escape your data. Sometimes valid data can unintentionally interfere with the format of the SQL statement itself. Use mysql_escape_string() or an escaping function native to your particular database. If there isn’t a specific one, addslashes() is a good last resort.

Where do you store your PHP script configurations like DB access data?

Here is the article.

I have an config.php file where I simply make an huge array that contains all the framework configuration. Also the database source string thing like "mysql:host=localhost;dbname=mydb" (whats that called, btw?) and username + password for DB. I'm afraid this is:

  1. stupid
  2. not good; better solution there
  3. not secure (?)

so how do the PHP experts do that?


12

If you have a www, httpdocs or public_http folder or something like that, where your php application is situated, then it is good practice to put the config file outside of that folder, and just access it like this:

include "../config.php";

Nobody can gain access to that file without FTP access, and so it's relatively safe compared to having it in the application folder.

If you don't have such a folder, you can create one, and make a .htaccess file in the root, which redirects all requests to that folder. There are many different ways to do that, but that's a different question all together.

  • unfortunately, almost 99,99% of all cheap virtual hosters don't provide any such directory. Everything from within the root is accessible, and there's no ftp access to what's above the web root.  Dec 27, 2009 at 12:36
  • 1
    Actually, most 'cheap' hosts I've had, have provided such a directory in some form or another. It's also in the host's interest to do so. But see my edit for options.  Dec 27, 2009 at 12:41 
  • @openfrog: quite a statement you have there, where do you get your data from?  Dec 27, 2009 at 16:42
  • all the cheap virtual hosting i've ever seen has this option. 
    – nickf
     Jan 8, 2010 at 22:19

WPengine | Using MySQL With WordPress

Here is the article. 

Posted in WordPress by Erin Myers

Last updated on February 2nd, 2022


If you manage a WordPress website, you may have found yourself wanting to know more about how its database functions. It’s useful to understand how your site works behind the scenes, and there may even be times when you need to access your site’s database directly. 

That’s where MySQL comes in. Structured Query Language (SQL) is the management system for WordPress’ databases. We’ll go into greater detail later, but suffice it to say that the database is the brains of your website and MySQL is the nervous system, sending commands back and forth to retrieve information and execute operations. 

In this article, we’ll provide a detailed explanation of how MySQL works in regards to WordPress. Additionally, we’ll review several database errors you might encounter and explain how to remedy them. Let’s dive right in!

MySQL Explained

You may have heard a database described before as a filing cabinet, a place to hold all of your site’s important information in categorized slots. In this analogy, the individual folders within the cabinet are the database tables that hold information.

As for MySQL, it’s how requests are made to place or remove data within these folders. You can also use MySQL to set rules for what is allowed to be placed in each part of the filing cabinet.  

MySQL can’t operate alone, however. It is part of a stack of software applications used to create websites. The other components include Linux, Apache, MySQL, and PHP (LAMP). Together, they form the ‘dream team’ of the open-source programming world. 

Using MySQL for WordPress

When it comes to WordPress, the PHP scripting language is used to send and retrieve information from your MySQL database. These two elements handle everything from logging in site users, to storing theme and plugin information for dynamic content display. 

MySQL uses table structures to store data. Most web hosts come with a MySQL user interface software called phpMyAdmin. This free and open-source piece of software makes it easy to run database commands. It enables you to edit, delete, or create tables, rows, and fields:

During a standard WordPress installation, 12 tables are created in your database. You can see them listed on the left in the above image. These tables include key information required for your site to function.

For example, the wp_options table stores the options you can access and control from the Settings menu in your WordPress dashboard. It’s also the home to your various widget-related settings.

As you can see in the phpMyAdmin panel, information about all the data contained in any table will be visible when you click on its name. This includes any values or parameters associated with specific fields.

MySQL Plugins/Extensions

While there aren’t many plugins that directly enhance MySQL functionality within WordPress, there are a few tools worth checking out if you plan on manually changing or altering your database often.

For example, WP phpMyAdmin is a useful plugin if you want to be able to access your site’s phpMyAdmin panel from within your WordPress dashboard, rather than through your web host’s control panel:

This is a simple but popular solution that offers convenient access to your database. That can also make it a bit easier to resolve MySQL-related errors, as we’ll see below.

Common MySQL Errors in WordPress (And How to Solve Them)

Database errors can happen to anyone, but can be frustrating to deal with. To make your life simpler, it helps to understand the most common problems that can arise, as well as each one’s likely solutions. Let’s look at five examples of typical MySQL issues.

1. Error Establishing a Database Connection

If you encounter a message like “Error establishing a database connection” when trying to access your site, it likely means that your URL is pointing to the wrong database or your site is encountering a connection error.

A database connection error means that you won’t be able to access your website. You’ll likely also be blocked from logging in to your administration panel. In this scenario, your wp-config.php file is most likely the culprit.

The first way you can resolve this issue is by accessing your site’s hosting account and restoring a recent backup. This will reset your wp-config.php file, giving you access to your administration panel. If it’s not possible to access a backup of your site, however, there is another solution.

You can also edit your wp-config.php file using a Secure File Transfer Protocol (SFTP) application like FileZilla. Once you connect to your website, your wp-config.php file can be found in the root directory of your site’s files.

If you open the file, you’ll see all your database information near the top. You can then check to see if there is a mistake in your database name, user name, or any other information regarding your site.

You may need to contact your host if you are unsure of what this information should include. You’ll be mostly concerned with verifying the correct “DB_USER”, “DB_PASSWORD”, and “DB_HOST”. Once you complete the necessary corrections, be sure to save your changes and upload the file back to your site’s server. 

2. Error #1005

The #1005 error is a server-side issue, rather than a problem with your site. It occurs when a necessary table could not be created. Depending on the details of the message string, you may get more information about the cause of the error.

For instance, your error message might look like this: 

Can't create table '%s' (errno: %d)

The most common “errno” with this particular issue is “(errno: 150)”. This means there is a foreign key constraint issue. In other words, it’s likely that the table you are trying to create conflicts with a set constraint. The error is preventing inconsistencies from occurring in data between multiple tables. 

In order to solve a foreign key constraint error, you’ll need to do a little investigating and check your database tables for inconsistencies. This means you’ll want to: 

  • Make sure the tables involved are all referencing the same database engine.
  • Check to verify that the fields you are indexing all have the same type or length. 

This error typically involves simple inconsistencies, and simply requires a little time and patience to rectify.

3. Error #1213 

This next error will typically appear alongside an “ER_LOCK_DEADLOCK” symbol. You should also receive a message that looks like this: “Deadlock found when trying to get lock; try restarting transaction”. Fortunately, this is an error that comes with instructions you can use to solve it quickly. 

When you execute a transaction that encounters a deadlock, your transaction will stop and roll back. This is due to an SQL command that stops the transaction and undoes any changes it made. You can think of this as an automatic ‘undo’ function that enables your application to stop and take corrective action. 

In this case, you’ll just need to run the transaction again. The rollback will have released the locks that triggered the deadlock, and the transaction should now complete successfully. 

4. Error #1064 

If you receive a #1064 error, you’ll also see a symbol display that reads “ER_PARSE_ERROR”. This means you have a mistake in your syntax. This might be due to a typo, or the use of an outdated command.

You should also receive a message with some helpful information, such as: 

%s near '%s' at line %d

This will direct you to an approximate line in your query, which you can reference to locate and fix the syntax error. There are also some tools available online to help you find errors in particularly long queries. 

5. Error # 2003 

Finally, a #2003 error results when you can’t connect to the MySQL server. The error symbol will indicate a host connection issue: 

CR_CONN_HOST_ERROR

In other words, this error message lets you know that your network connection has been refused. Your first step in correcting the issue will be to determine whether a MySQL server is running. Next, you’ll want to make sure the network connection and ports you indicated are the same that you configured on the server. 

You can do this through your phpMyAdmin panel, by going to Status > Monitor and viewing the activity on your server for issues. If your server is not running, you’ll need to go through the steps for restarting it as well.

If your mysqld process is running, you’ll need to have some deeper knowledge of the server connection to the network, so you can start working through possible disruptions to your connection. 

Level Up Your Knowledge With WP Engine

While not everyone will be spending time with their site’s MySQL server regularly, it’s useful to understand where to go for help if you encounter an error. That’s why it helps to know where to find the best advice and developer resources online.

To help you keep your site running smoothly at all times, we offer a variety of hosting solutions and tools. This includes the WP Engine Error Log, which helps you provide your visitors with the best digital experience possible!

Top 10 Alternatives & Competitors to Cloudways

 Browse options below. Based on reviewer data you can see how Cloudways stacks up to the competition, check reviews from current & previous users in industries like Marketing and Advertising, Retail, and Internet, and find the best product for your business.

  1. Pantheon
  2. Hostwinds
  3. G2 Deals
  4. SiteGround
  5. A2 Hosting
  6. Kinsta
  7. DreamHost
  8. Bluehost
  9. WP Engine
  10. DigitalOcean
  11. Liquid web managed hosting
  12. G2 Deals

Cloudways


About

Cloudways is a managed hosting provider that emphasizes performance and simplicity. From the simple server and application launch to the ongoing server maintenance, Cloudways takes away all the hassles of server management so that you can continue to focus on growing your business. Our mission is to empower people so that they can move their dreams forward. We believe in winning as a team with innovation & simplicity. And we do this by investing in the right talent and by organizing the perfect teams. When you join Cloudways, you get a suite of powerful tools and services to manage your ecommerce stores and business websites. The core USP of Cloudways is choice - the choice of cloud providers, the choice of hosting almost every PHP powered application, the choice of using a paid or free SSL and the choice of developer and agency-focused workflows. The ideas of choice and freedom to focus on what’s important to the users start right from the moment of server & application launch. With the choice of five IaaS providers; AWS, GCE, DigitalOcean, Vultr, and Linode and 65+ server locations around the world, our users can configure the Cloudways Platform to fit their operational requirements and business processes. Visit www.cloudways.com to learn more.

Gary Wang

 Here is the article.

  • The co-founder of Alameda Research and FTX
  • A mysterious ex-Googler who also served as chief technology officer for both firms
  • Reportedly Bankman-Fried’s childhood friend

Gray Wang is not like his co-founder Sam Bankman-Fried, who loves fame and putting himself at the center of public attention (even when people are begging him to stop tweeting). In fact, there’s little public information about Wang, who has been described as a shady but critical player in the rise and fall of FTX.

Wang met Bankman-Fried at a math camp in high school. Later, they became college roommates at the Massachusetts Institute of Technology, where Wang got degrees in mathematics and computer science and Bankman-Fried received a bachelor's in physics.