Here is the article.
By Erin Glass
Introduction
Nginx is one of the most popular web servers in the world and is responsible for hosting some of the largest and highest-traffic sites on the internet. It is a lightweight choice that can be used as either a web server or reverse proxy.
In this guide, we’ll discuss how to install Nginx on your Ubuntu 20.04 server, adjust the firewall, manage the Nginx process, and set up server blocks for hosting more than one domain from a single server.
Prerequisites
Before you begin this guide, you should have a regular, non-root user with sudo privileges configured on your server. You can learn how to configure a regular user account by following our Initial server setup guide for Ubuntu 20.04.
You will also optionally want to have registered a domain name before completing the last steps of this tutorial. To learn more about setting up a domain name with DigitalOcean, please refer to our Introduction to DigitalOcean DNS.
When you have an account available, log in as your non-root user to begin.
Step 1 – Installing Nginx
Because Nginx is available in Ubuntu’s default repositories, it is possible to install it from these repositories using the apt packaging system.
Since this is our first interaction with the apt packaging system in this session, we will update our local package index so that we have access to the most recent package listings. Afterwards, we can install nginx:
After accepting the procedure, apt will install Nginx and any required dependencies to your server.
Step 2 – Adjusting the Firewall
Before testing Nginx, the firewall software needs to be adjusted to allow access to the service. Nginx registers itself as a service with ufw upon installation, making it straightforward to allow Nginx access.
List the application configurations that ufw knows how to work with by typing:
You should get a listing of the application profiles:
OutputAvailable applications:
  Nginx Full
  Nginx HTTP
  Nginx HTTPS
  OpenSSH
As demonstrated by the output, there are three profiles available for Nginx:
- Nginx Full: This profile opens both port 80 (normal, unencrypted web traffic) and port 443 (TLS/SSL encrypted traffic)
- Nginx HTTP: This profile opens only port 80 (normal, unencrypted web traffic)
- Nginx HTTPS: This profile opens only port 443 (TLS/SSL encrypted traffic)
It is recommended that you enable the most restrictive profile that will still allow the traffic you’ve configured. Right now, we will only need to allow traffic on port 80.
You can enable this by typing:
You can verify the change by typing:
The output will indicated which HTTP traffic is allowed:
OutputStatus: active

To                         Action      From
--                         ------      ----
OpenSSH                    ALLOW       Anywhere
Nginx HTTP                 ALLOW       Anywhere
OpenSSH (v6)               ALLOW       Anywhere (v6)
Nginx HTTP (v6)            ALLOW       Anywhere (v6)
Step 3 – Checking your Web Server
At the end of the installation process, Ubuntu 20.04 starts Nginx. The web server should already be up and running.
We can check with the systemd init system to make sure the service is running by typing:
Output● nginx.service - A high performance web server and a reverse proxy server
   Loaded: loaded (/lib/systemd/system/nginx.service; enabled; vendor preset: enabled)
   Active: active (running) since Fri 2020-04-20 16:08:19 UTC; 3 days ago
     Docs: man:nginx(8)
 Main PID: 2369 (nginx)
    Tasks: 2 (limit: 1153)
   Memory: 3.5M
   CGroup: /system.slice/nginx.service
           ├─2369 nginx: master process /usr/sbin/nginx -g daemon on; master_process on;
           └─2380 nginx: worker process
As confirmed by this out, the service has started successfully. However, the best way to test this is to actually request a page from Nginx.
You can access the default Nginx landing page to confirm that the software is running properly by navigating to your server’s IP address. If you do not know your server’s IP address, you can find it by using the icanhazip.com tool, which will give you your public IP address as received from another location on the internet:
When you have your server’s IP address, enter it into your browser’s address bar:
http://your_server_ip
You should receive the default Nginx landing page:
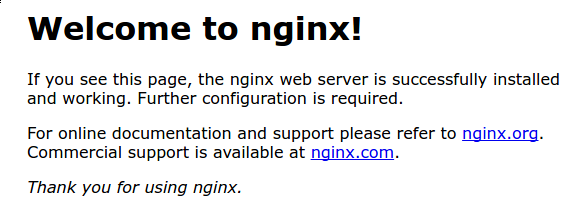
If you are on this page, your server is running correctly and is ready to be managed.
Step 4 – Managing the Nginx Process
Now that you have your web server up and running, let’s review some basic management commands.
To stop your web server, type:
To start the web server when it is stopped, type:
To stop and then start the service again, type:
If you are only making configuration changes, Nginx can often reload without dropping connections. To do this, type:
By default, Nginx is configured to start automatically when the server boots. If this is not what you want, you can disable this behavior by typing:
To re-enable the service to start up at boot, you can type:
You have now learned basic management commands and should be ready to configure the site to host more than one domain.
Step 5 – Setting Up Server Blocks (Recommended)
When using the Nginx web server, server blocks (similar to virtual hosts in Apache) can be used to encapsulate configuration details and host more than one domain from a single server. We will set up a domain called your_domain, but you should replace this with your own domain name.
Nginx on Ubuntu 20.04 has one server block enabled by default that is configured to serve documents out of a directory at /var/www/html. While this works well for a single site, it can become unwieldy if you are hosting multiple sites. Instead of modifying /var/www/html, let’s create a directory structure within /var/www for our your_domain site, leaving /var/www/html in place as the default directory to be served if a client request doesn’t match any other sites.
Create the directory for your_domain as follows, using the -p flag to create any necessary parent directories:
Next, assign ownership of the directory with the $USER environment variable:
The permissions of your web roots should be correct if you haven’t modified your umask value, which sets default file permissions. To ensure that your permissions are correct and allow the owner to read, write, and execute the files while granting only read and execute permissions to groups and others, you can input the following command:
Next, create a sample index.html page using nano or your favorite editor:
Inside, add the following sample HTML:
Save and close the file by pressing Ctrl+X to exit, then when prompted to save, Y and then Enter.
In order for Nginx to serve this content, it’s necessary to create a server block with the correct directives. Instead of modifying the default configuration file directly, let’s make a new one at /etc/nginx/sites-available/your_domain:
Paste in the following configuration block, which is similar to the default, but updated for our new directory and domain name:
Notice that we’ve updated the root configuration to our new directory, and the server_name to our domain name.
Next, let’s enable the file by creating a link from it to the sites-enabled directory, which Nginx reads from during startup:
Note: Nginx uses a common practice called symbolic links, or symlinks, to track which of your server blocks are enabled. Creating a symlink is like creating a shortcut on disk, so that you could later delete the shortcut from the sites-enabled directory while keeping the server block in sites-available if you wanted to enable it.
Two server blocks are now enabled and configured to respond to requests based on their listen and server_name directives (you can read more about how Nginx processes these directives here):
your_domain: Will respond to requests foryour_domainandwww.your_domain.default: Will respond to any requests on port 80 that do not match the other two blocks.
To avoid a possible hash bucket memory problem that can arise from adding additional server names, it is necessary to adjust a single value in the /etc/nginx/nginx.conf file. Open the file:
Find the server_names_hash_bucket_size directive and remove the # symbol to uncomment the line. If you are using nano, you can quickly search for words in the file by pressing CTRL and w.
Note: Commenting out lines of code – usually by putting # at the start of a line – is another way of disabling them without needing to actually delete them. Many configuration files ship with multiple options commented out so that they can be enabled or disabled, by toggling them between active code and documentation.
...
http {
    ...
    server_names_hash_bucket_size 64;
    ...
}
...
Save and close the file when you are finished.
Next, test to make sure that there are no syntax errors in any of your Nginx files:
If there aren’t any problems, restart Nginx to enable your changes:
Nginx should now be serving your domain name. You can test this by navigating to http://your_domain, where you should see something like this:

Step 6 – Getting Familiar with Important Nginx Files and Directories
Now that you know how to manage the Nginx service itself, you should take a few minutes to familiarize yourself with a few important directories and files.
Content
/var/www/html: The actual web content, which by default only consists of the default Nginx page you saw earlier, is served out of the/var/www/htmldirectory. This can be changed by altering Nginx configuration files.
Server Configuration
/etc/nginx: The Nginx configuration directory. All of the Nginx configuration files reside here./etc/nginx/nginx.conf: The main Nginx configuration file. This can be modified to make changes to the Nginx global configuration./etc/nginx/sites-available/: The directory where per-site server blocks can be stored. Nginx will not use the configuration files found in this directory unless they are linked to thesites-enableddirectory. Typically, all server block configuration is done in this directory, and then enabled by linking to the other directory./etc/nginx/sites-enabled/: The directory where enabled per-site server blocks are stored. Typically, these are created by linking to configuration files found in thesites-availabledirectory./etc/nginx/snippets: This directory contains configuration fragments that can be included elsewhere in the Nginx configuration. Potentially repeatable configuration segments are good candidates for refactoring into snippets.
Server Logs
/var/log/nginx/access.log: Every request to your web server is recorded in this log file unless Nginx is configured to do otherwise./var/log/nginx/error.log: Any Nginx errors will be recorded in this log.
Conclusion
Now that you have your web server installed, you have many options for the type of content to serve and the technologies you want to use to create a richer experience.
If you’d like to build out a more complete application stack, check out the article How To Install Linux, Nginx, MySQL, PHP (LEMP stack) on Ubuntu 20.04.
In order to set up HTTPS for your domain name with a free SSL certificate using Let’s Encrypt, you should move on to How To Secure Nginx with Let’s Encrypt on Ubuntu 20.04.