May 14, 2021
Here is the link.
It is hard for me to learn technology over last decade. I like to read the following technical article in less than two hours.
- I will install MongoDB at my home office computer.
How to Program with MongoDB Using the .NET Driver
As more shops move to NoSQL databases, developers must learn new techniques for querying and updating data. In this article, Darko Martinović demonstrates how to work with MongoDB in .NET.
Many people that have a background in relational databases are confused with the terms NoSQL and the document database. What kind of documents are in the database and how to get data without the query language, without SQL? In my opinion, the term NoSQL does not mean that there is no schema, rather than the schema is not strictly enforced. And, of course, there is a query language as well.
During the past few years, JSON has become extremely popular. Getting data from various forms (i.e., WEB and WIN forms) became extremely easy using JSON. Furthermore, saving such data as users entered them dictates the shape of the data. The shape of the data is determined by the application itself, unlike a relational database in which the data are independent of the application. In NoSQL databases, the data are saved in the JSON document. The table record in the relational world is equivalent to the JSON document in the NoSQL world.
I think that it is easier to learn something new by comparing with something that you already know. This article will try to be a gentle introduction to the NoSQL world and will explain how to transform part of a well-known database, AdventureWorks2016, to NoSQL as shown in the image below.
For this article, I had to choose between MongoDB and Cosmos DB. Both databases provide challenges and opportunities, but, in my opinion, MongoDB has an advantage. It provides more free options than Cosmos DB. Furthermore, MongoDB is a multiplatform database with an on-premise edition that is much richer than the Cosmos DB Emulator.
Let’s get started. The first step is to set up the environment. This means installing the MongoDB database, installing the NET driver, and importing some data.
Setting up the environment
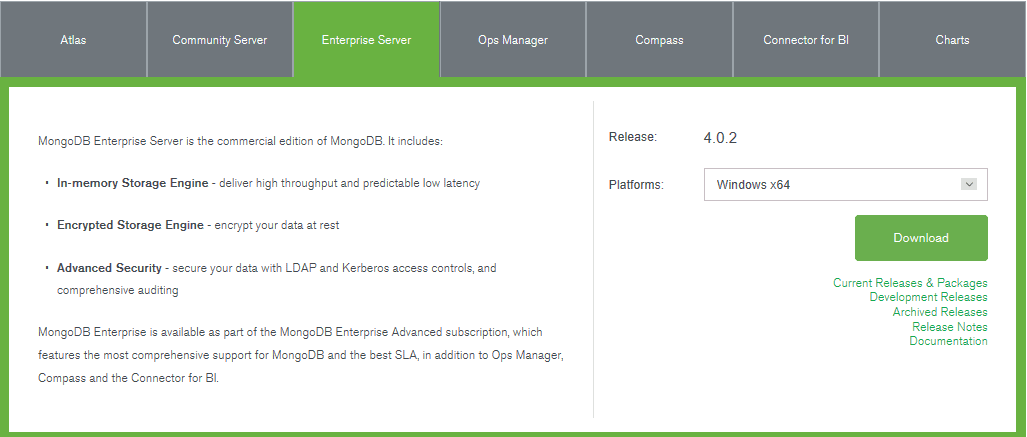
At the time of this writing, October 2018, the current version of MongoDB in 4.0.2, and the current version of the .NET driver is 2.7. To install MongoDB, start with a Google search for ‘Mongo DB download’ or click on the link. From the list of available platforms, choose Windows x64. Then fill in the form with your first and last name, e-mail address, and so on. After that, save the MSI installation file locally.
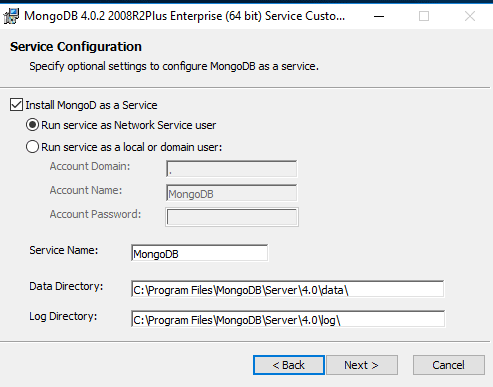
The installation is straightforward. MongoDB will be installed as a Windows service by default. You have the option of choosing the service name, the service user, and startup folders for data and log files, as shown in the image below.
If you choose the Custom installation option, you may specify an installation directory. The MongoDB installation will put the executables in C:\Program Files\MongoDB\Server\4.0\bin folder by default. Be sure to add this path to your PATH environment variable to be able to run the MongoDB shell from any folder in the command prompt.
Feel free to explore executables installed in the folder. The most important is mongod the windows service itself, mongo the shell and mongoimport, a utility that helps import various data in the database. You should also install the MongoDB GUI explorer called Compass from the link.
The next step in setting the environment is to install the NET driver. To do that, start Visual Studio. I’m using the VS 2017 Community Edition in this article.
Create a new console project using C#, and name it as you wish. The purpose of creating a new project is to show you how to reference the MongoDB .NET driver. From the project context menu, choose Manage NuGet Packages. After NuGet Package Manager appears, enter MongoDB driver in the Browse tab as shown in the image below.
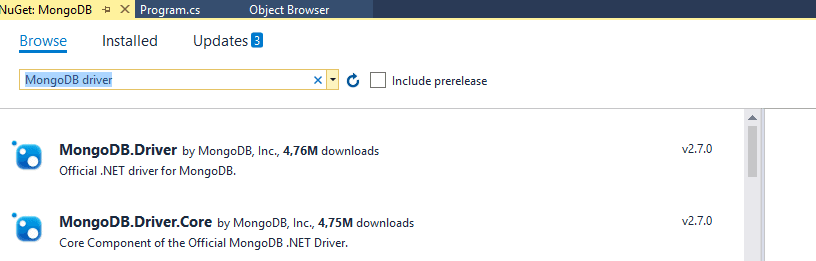
Choose and install MongoDB.Driver, and the three main components for programming MongoDB by using .NET are installed. All three are published together, as shown by version number, in the image below.
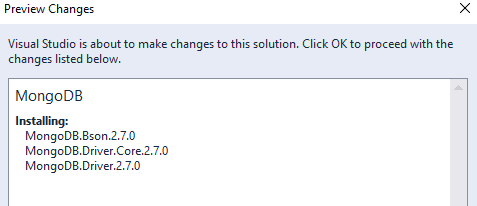
MongoDB.Bson handles various types and-file formats as well as the mapping between CLR types to BSon. BSon is MongoDB representation of JSON. I will write much more about BSon later.
MongoDB.Driver.Core handles connection pooling, communication between clients and database and so on. Usually, there is no need to work with this library directly.
MongoDB.Driver is where the main API is located.
Once you download the three main libraries, you can start any new project and copy references from this first project. At this point, you can save and close this first project.
In order to follow the article, please, download the article solution from the GitHub. Open the solution by starting another instance of Visual Studio. In the solution notice the folder Data as shown in the image below.
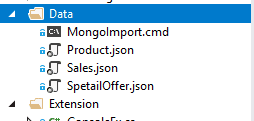
The folder contains three JSON files that must be imported by using a MongoDB command line utility called mongoimport. Determine where on your local disk those three files are located. Start the command prompt from that location. In the command prompt window, execute the following three commands.
mongoimport --db simpleTalk --collection adventureWorks2016 --file sales.json --jsonArray mongoimport --db simpleTalk --collection spetialOffer --file SpetailOffer.json --jsonArray mongoimport --db simpleTalk --collection products --file Product.json --jsonArray |
By executing these commands, you will create a MongoDB database named simpleTalk (camel case naming) and three collections named: adventureWorks2016, specialOffer, and product as shown in the image below from Compass. When starting Compass, it tries to establish a connection on localhost port 27017. Just press Connect and, on the left side, select the database simpleTalk.
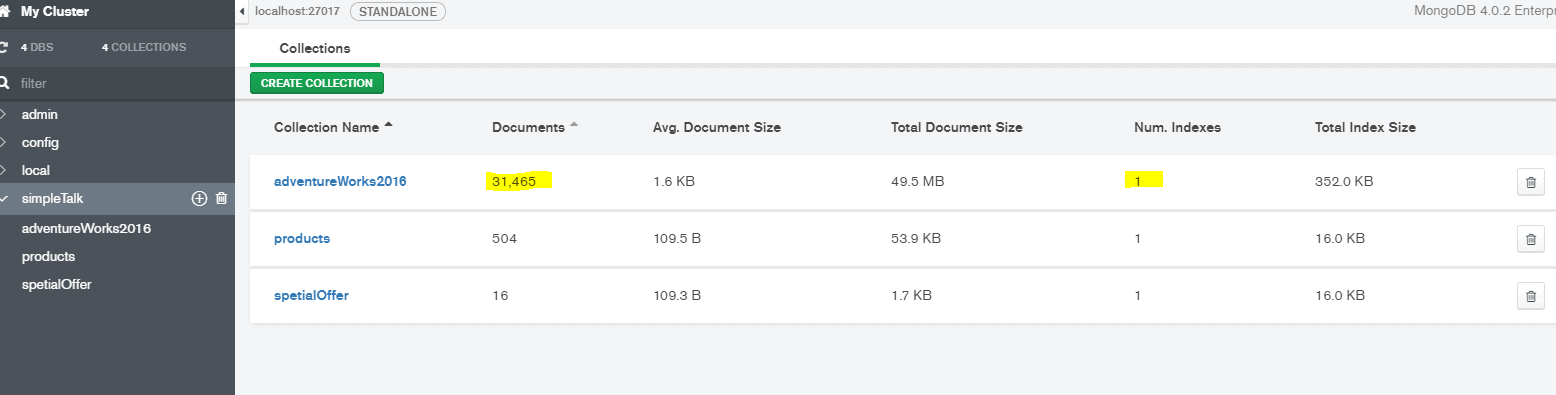
The collection in NoSQL is similar to the table in the SQL world and provides a namespace for the document. To prove that the import was successful, start the mongo shell from the command prompt. In the command prompt, type mongo to enter into the shell.
Once you enter the shell, type use simpleTalk to switch in the context of the database. And then type show collections and you will be able to see all three imported collections.
To conclude this first section, notice the Authentication folder in the article’s solution. Inside the folder, there is a JavaScript file named AddUser.js. If you are not in the mongo shell, start it again. In the context of the simpleTalk database, execute the code of AddUser.js, as shown in the snippet below, to create a user.
db.createUser( { user: "usrSimpleTalk", pwd: "pwdSimpleTalk", roles: [{ role: "readWrite", db: "simpleTalk" }] } ) |
All examples in the article will execute in the context of this newly created user usrSimpleTalk. The user has been granted read and write permissions to the database.
Now it’s time to talk about how to connect to the MongoDB database, how CLR types are mapped to BSon types, and the root objects in the MongoDB .NET driver.
Connecting to MongoDB
The purpose of this section is to provide information on how to connect to the MongoDB database and to examine the most important objects of MongoDB API for .NET. Those objects are the MongoDB client, the Mongo database, and the Mongo collection. Open the article solution and make sure that the startup object is Auth as shown in the image below.
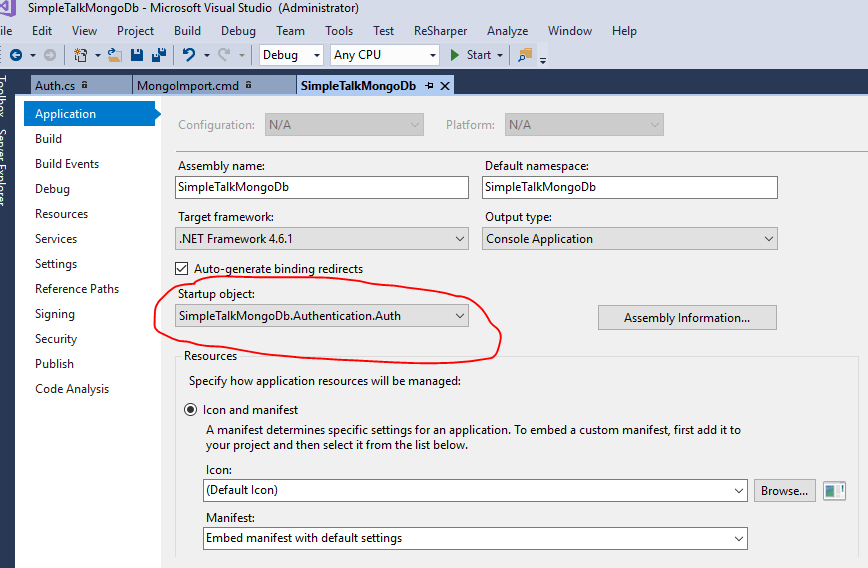
The class named Auth demonstrates how to connect to the MongoDB database. MongoClient is the root object that provides that connectivity.
There are several various methods to connect to the database. The first way is to pass the database name, the username, and the password, as shown in the snippet below.
var credential =MongoCredential.CreateCredential(databaseName: Dbase, username: UserName, password: Password); var settings = new MongoClientSettings { Credential = credential }; var mongoClient = new MongoClient(settings); |
As you may have noticed by browsing the code, there is no need for opening, closing and disposing of connections. The client object is cheap, and the connection is automatically disposed of, unlike ADO.NET in which the connection is a very expensive resource. This approach is shown in the solution. In the solution, there is one configuration object located in the Configuration folder and named SampleConfig.
The MongoClient has many overloads. The most common way to instantiate the client is to pass a connection string, as shown in the snippet below.
//Using connectionString var connectionString = $"mongodb://{UserName}:{Passwrod}@localhost:27017/{Dbase}"; mongoClient = new MongoClient(connectionString); |
By default, MongoDB API uses port 27017 to communicate with the database, but there are many more options. That includes connecting to multiple servers, the replica sets and so on.
At this point, I have to make a digression. One common thing that I would like to know is the number of currently opened connection. By using the mongo shell, it is possible to see that number but without further information.
If you execute in the mongo shell command db.serverStatus().connections, you will see the response in the form of a document, as shown in the image below.

The only way to get more information is to use netstat –b in the cmd window with elevated permissions and getting the result as displayed on the image below.

Let’s get back to the main topic. Down in the object hierarchy is the database object. To get a reference to the database, usually, you execute the following snippet.
var db = mongoClient.GetDatabase($"{Dbase}"); |
The database is accessed in the context of the client. If you explore the exposed method in the client, you will notice that there are no options for creating a database. That is because the database is created automatically when it is needed and if it doesn’t exist.
In the context of the database, you can get a reference to the collection by executing snippet like shown below.
var collection = db.GetCollection<SalesHeader>($"{Collection}"); |
or like this one
var collection = db.GetCollection<BsonDocument>($"{Collection}"); |
In the context of the database, you can create, drop, or rename a collection. There is a method to create a collection, but there is no need to use it because the collection will be created automatically if does not exist. The collection and the database object are both thread safe and could be instantiated once and used globally.
As you noticed in the snippets above, the only difference in getting a reference to a collection object is by passing a type. This is the type needed in .NET to work with the collection. One is a BsonDocument that represents a dynamic schema in which you can use any document shape, and one is a so-called strongly typed schema named SalesHeader. As you will discover in the article, SalesHeader is the class that mimics the table in the AdventureWorks2016 database named Sales.SalesHeader. The option that is strongly typed is the generally preferred way when working with MongoDB in .NET.
The document object is found lower in the object hierarchy. The most general way to represent the document is to use the BSonDocument class. The BsonDocument is basically a dictionary of keys (strings) and BsonValues. BsonValues will be examined in the next section. To conclude this section, F5 to start the article’s solution. The result will display on the console screen. It represents the number of documents in the adventureWorks2016 collection, and it is determined by calling the collections method CountDocumentsAsync.

Mapping CLR types to BSON types
Change the startup object in order to follow this section. This time set Attribute Decoration located in the Serialization folder as the startup object. In the section, I will refer to a couple of simple classes which definitions can be found in the Pocos folder POCO is an acronym for ‘plain old CLR object’ and represents a class that is unencumbered by inheritance.
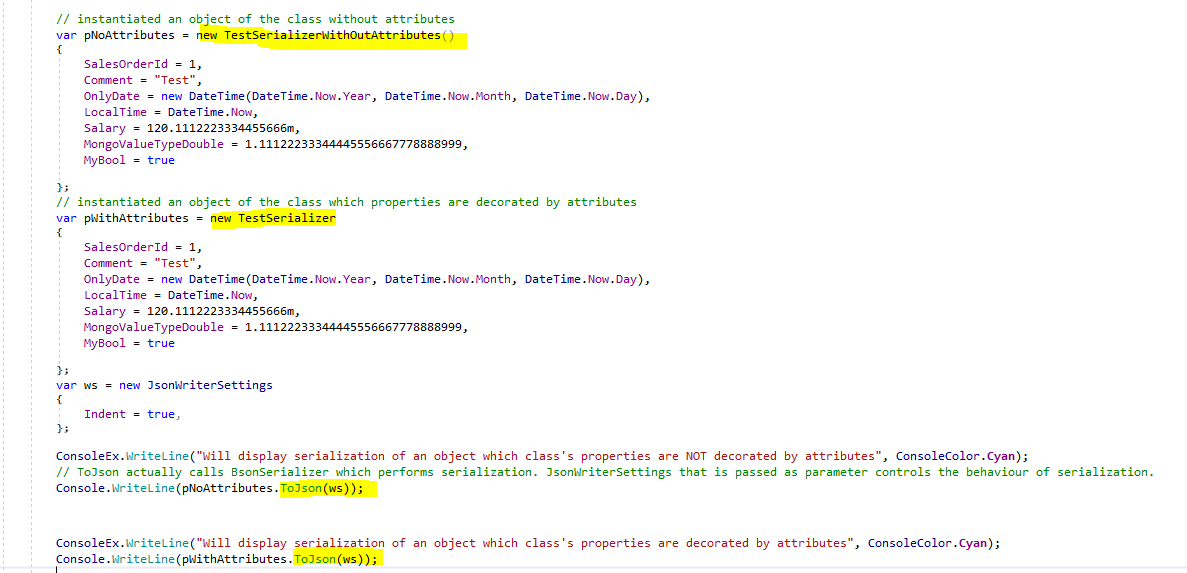
The first example uses two objects. The first one is of type TestSerializerWithOutAttributes, the second one of type TestSerializer. Both classes define the same properties of type bool, string, int, double and datetime. The classes’ definitions can be found in TestSerializer.cs located in the Pocos folder. The only difference between these two classes is that the second class has been decorated with attributes. In the example, I instantiate two objects and perform the basic serialization by using ToJson, as shown in the image below.
By pressing F5, the result will be displayed as shown in the image below.
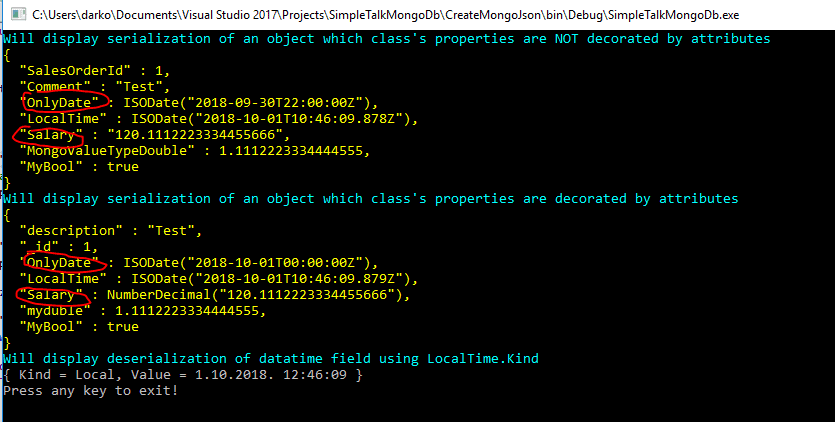
As you will notice, there are a couple of differences. One of them is that decimal type, by default, is displayed as a string. It must be decorated decimal type by attribute [BsonRepresentation(BsonType.Decimal128)], as is done in the definition of class TestSerializer.
Then, if you noticed, the property OnlyDate is set by using the following snippet
OnlyDate = new DateTime (DateTime.Now.Year, DateTime.Now.Month, DateTime.Now.Day), |
Therefore, there is no time part. I am located in the UTC +1h time zone, and because it’s currently daylight savings time, the default serializer reduces the date value by two hours. To avoid such behavior, I decorated, the property with the attribute [BsonDateTimeOptions(DateOnly =true)].
In the example, I am using some other attributes, which I’ll describe. If you would like to change the element name or specify a different order, try decorating the property with BsonElement as shown in the snippet below.
[BsonElement("description", Order= 1)] Public string Comment { get; set; } |
As you’ll see later, every BsonDocument that is part of a collection should have an element named _id. This is a kind of primary key in the NoSQL-Bson world. Also, by default, the collection is indexed by using this field. You are free to specify your own primary key by decorating a property or field in the class definition with the attribute BsonId, as shown in the snippet below.
[BsonId] public int SalesOrderId { get; set; } |
Finally, in order to specify that only a significant number of digits will be used when working with the double type, the following attribute is used:
// Double decorated with AllowTruncation [BsonRepresentation(BsonType.Double, AllowTruncation = true), BsonElement("myduble")] public double MongoValueTypeDouble { get; set; } |
You probably noticed that I use the word the default serializer, although in the code there is no call to any kind of serializer. This is because of the beautiful .ToJson extension. As you can see by using the Visual Studio peek definition or by pressing ALT + F12, ToJson is an extension of the object type defined in the MongoDB.Bson namespace. So, it should be safely used on any type.
There is one thing about ToJson I have to write about at this spot. As you probably noticed, the extension optionally receives a parameter of type JsonWriterSettings.
If you examine this class by using the Visual Studio peek definition, you will notice that the class has properties defined as shown in the image below.
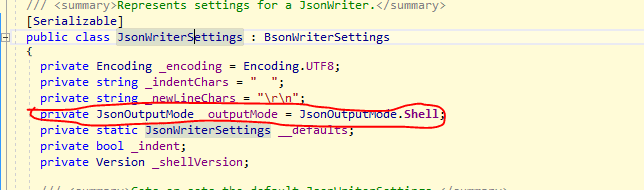
You can pay special attention to the property outputMode, as shown surrounded by red on the image above. This is an enumerator with two possible values. The default one is JsonOutputMode.Shell and the second one is JsonOutputMode.Strict. So, what is the difference? According to the MongoDB documentation :
- Strict mode. Strict mode representations of BSON types conform to the JSON RFC. Any JSON parser can parse these strict mode representations as key/value pairs; however, only the MongoDB internal JSON parser recognizes the type of information conveyed by the format.
- mongo Shell mode. The MongoDB internal JSON parser and the mongo shell can parse this mode.
My experience is that the mongoimport utility does not understand shell mode, so, I had to change the default serialization behavior to be mode strict in order to generate a JSON file that could be accepted by the mongoimport utility. You can find more about the differences between strict and shell mode here.
Besides decorating classes with attributes, there is an option to use so-called ClassMap. For example, if you want to keep serialization details out of their domain classes and do not want to play with attributes, you will use the ClassMap approach instead. This is not the only scenario in which you might use ClassMap. You can combine attribute decoration with ClassMap as well.
To practice working with ClassMap, switch the startup object in the article’s solution to ClassMap. In this example, I’m using the same type as before, an object of type TestSerializerWithOutAttributes, to produce the same output as in the previous example.
The class should be registered only once like is shown in the snippet below.
if (!BsonClassMap.IsClassMapRegistered(typeof(TestSerializerWithOutAttributes))) { BsonClassMap.RegisterClassMap<TestSerializerWithOutAttributes>(cm => |
An exception will be thrown if you try to register the same class more than once. Internally, BsonClassMap holds information about registered types in a dictionary like shown in the snippet below.
private static readonly Dictionary<Type, BsonClassMap> __classMaps = new Dictionary<Type, BsonClassMap>(); |
So, registering a class twice means adding a key to the dictionary that exists, which is, on the other hand, an exception. Usually, you call RegisterClassMap from some code path that is known to execute only once (the Main method, the Application_Start event handler, etc.).
The most common way when working with ClassMap is to use so-called AutoMap and after that perform some add-on coding as shown in the snippet below.
if (!BsonClassMap.IsClassMapRegistered(typeof(TestSerializerWithOutAttributes))) { BsonClassMap.RegisterClassMap<TestSerializerWithOutAttributes>(cm => { //only read and write properties are mapped cm.AutoMap(); //BsonId attribute cm.MapIdProperty(c => c.SalesOrderId); //Setting ElementName and Order cm.GetMemberMap(c => c.Comment).SetElementName("description").SetOrder(1); } } |
In the article’s solution, there is an example showing how to use AutoMap named ClassMapAutoMap, located in Serialization folder. However, I will not use this option in the article. For example, to specify that the decimal type should be rendered (NOTE: I use term rendered and serialized interchangeably) as a decimal rather than strings, following code is used. Notice that there is a predefined serializer for a decimal type.
// Setting the default decimal serializer cm.MapProperty(c => c.Salary).SetSerializer(new DecimalSerializer(BsonType.Decimal128)); |
In order to specify the element name and change the order that the element is rendered, the following snippet is used:
//Setting ElementName and Order cm.MapProperty(c => c.Comment).SetElementName("description").SetOrder(1); |
To serialize the DateTime type with only the date part, or to use Local Time, the following snippet is used. Notice that there is predefined serializer for the datetime type.
cm.MapProperty(c => c.OnlyDate).SetSerializer(new DateTimeSerializer(dateOnly: true)); cm.MapProperty(c => c.LocalTime).SetSerializer(new DateTimeSerializer(DateTimeKind.Local)); |
Similarly, to specify that SalesOrderId should be treated as a BsonId, the following snippet is used
// BsonId attribute cm.MapIdProperty(c => c.SalesOrderId); |
Finally, to specify only a significant part of the digits to be serialized when working with the double type, the following code snippet is used
// we have to set an object of type RepresentationConverter and pass allowTruncation 'true' var rp = new RepresentationConverter(allowOverflow: false, allowTruncation: true); cm.MapProperty(c => c.MongoValueTypeDouble).SetElementName("mydouble") .SetSerializer(new DoubleSerializer(BsonType.Double, converter: rp)); |
Also, by pressing F5, you should get the same result as in the previous example.
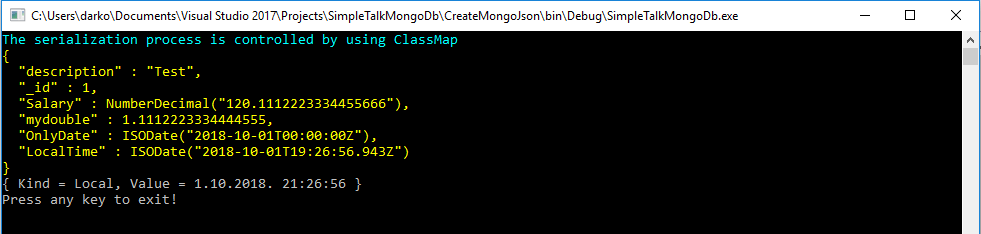
That is not the end of the possibilities. There is an option to use the so-called Convention Pack. In short, to be able to follow the section from this point, change the startup object to be TestConventionPack.
When working with ClassMap and ‘automapping,’ many decisions should be made. What property should be BsonId, how should the decimal type be serialized, what will be the element name, and so on?
Answers to these questions are represented by a set of conventions. For each convention, there is a default convention that is the most likely one you will be using, but you can override individual conventions and/or write your own convention.
If you want to use your own conventions that differ from the defaults, simply create an instance of ConventionPack, add in the conventions you want to use, and then register that pack (in other words, tell the default serializer when your special conventions should be used).
For example, to instantiate an object of the type of ConventionPack, you might use the following snippet:
var conventions = new ConventionPack { new CamelCaseElementNameConvention(), new DecimalRepresentationConvention(BsonType.String), new DateOnlyRepresentation(BsonType.DateTime), new LocalDateRepresentation(BsonType.DateTime) }; |
The first convention, CamelCaseElementNameConvention, will tell default serializer to put all elements name in CamelCase. This is a predefined convention. All other conventions are defined in the example and represent the custom conventions. DecimalRepresentationConvention will tell the default serializer to serialize all decimal properties as a decimal, rather than a string, which is the default option. Similar to this is the DateOnlyRepresentation and LocalDateReporesentation. When working with ClassMap, you should connect your class with convention pack. This is usually accomplished like is shown in the code snippet:
ConventionRegistry.Register("Test", conventions, type => type.FullName != null && type.FullName.Contains("TestSerializerWithOutAttributes")); |
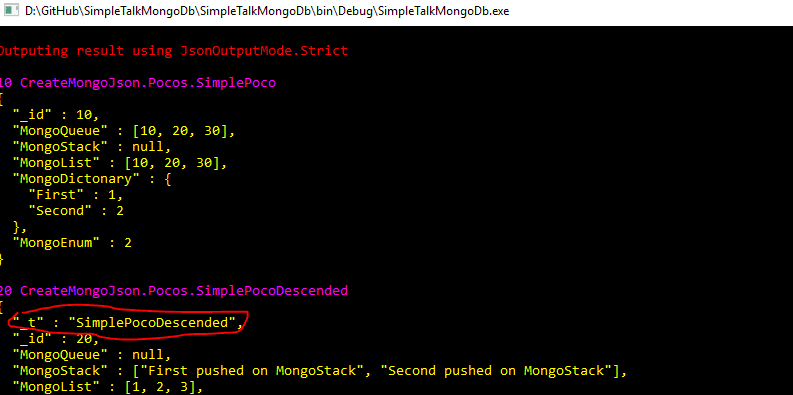
In the Serialization folder, there is a class named TestTypes as well. Please, change the startup object to be TestTypes. This example shows how complex types are transformed into JSON(BSON). This includes .NET native types like generic collections, as well as classes that inherit from other classes. When a class inherits from other class, a special field _t, that represents the type, is rendered as shown in the image below, surrounded with red.
As a take away from this section, it’s possible to decorate the class with attributes, work with ClassMap, and, finally, work with ConventionPack.
API is very easy to use and very hard to misuse when working with serialization. Now it is time to talk about collections. How are they designed? The next section is about schema design.
Schema design
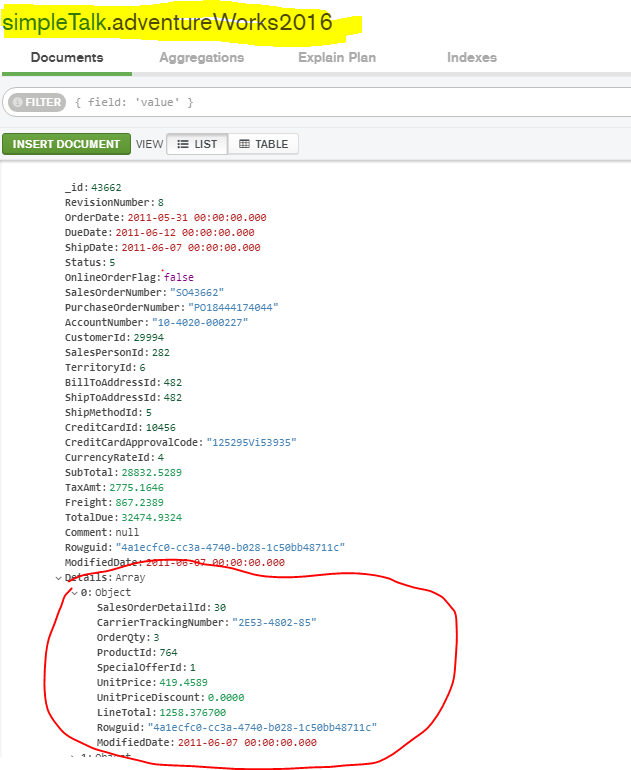
One of the documents in the adventureWorks2016 collection looks as shown in the image below.
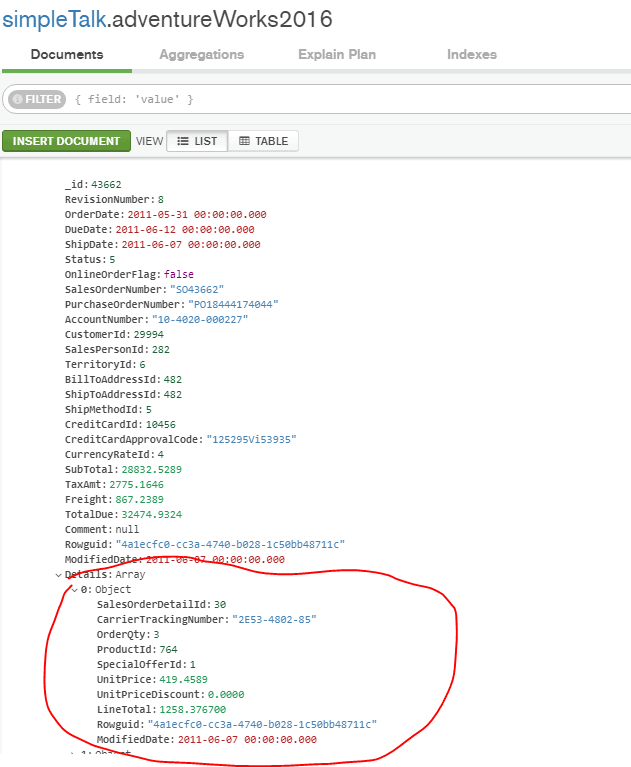
As you’ll notice, a detail array that represents details of an order is embedded in the document. In the SQL world, details of an order are put in a separate table known as Sales.SalesDetail. You could do the same thing in MongoDB, e.g., put details in a separate collection, but as you may recall from the introduction, in the NoSQL world, the shape of the data is determined by the application itself. There’s a good chance that when you are working with the sales data, you probably need sales details. The decision about what to put in the document is pretty much determined by how the data is used by the application. The data that is used together as sales documents is a good candidate to be pre-joined or embedded.
One of the limitations of this approach is the size of the document. It should be a maximum of 16 MB.
Another approach is to split data between multiple collections which is also used in the article solution. For example, details about products and special offers are separated into another collection. One of the limitations of this approach is that there is no constraint in MongoDB, so there are no foreign key constraints as well. The database does not guarantee consistency of the data. Is it up to you as a programmer to take care that your data has no orphans.
Data from multiple collections could be joined by applying the lookup operator, as I’ll show in the section that talks about aggregations. But, a collection is a separate file on disk, so seeking on multiple collections means seeking from multiple files, and that is, as you are probably guessing, slow. Generally speaking, embedded data is the preferable approach.
The underlying CLR class to work with the adventureWorks2016 collection is SalesHeader. Its definition is located in the Pocos solution folder.
In the class definition, the detail is represented as shown in the following snippet.
public List<SalesDetail> Details { get; set; } |
It is a generic List of SalesDetail. The SalesDetail class mimics the Sales.SalesDetail table. The CLR class to work with the product collection is Product and, to work with the spetialOffer collection, a class SpetialOffer is designed. The source code that shows you how these collections are generated is located in the Loaders folder.
The image below displays the content of the spetailOffer collection.
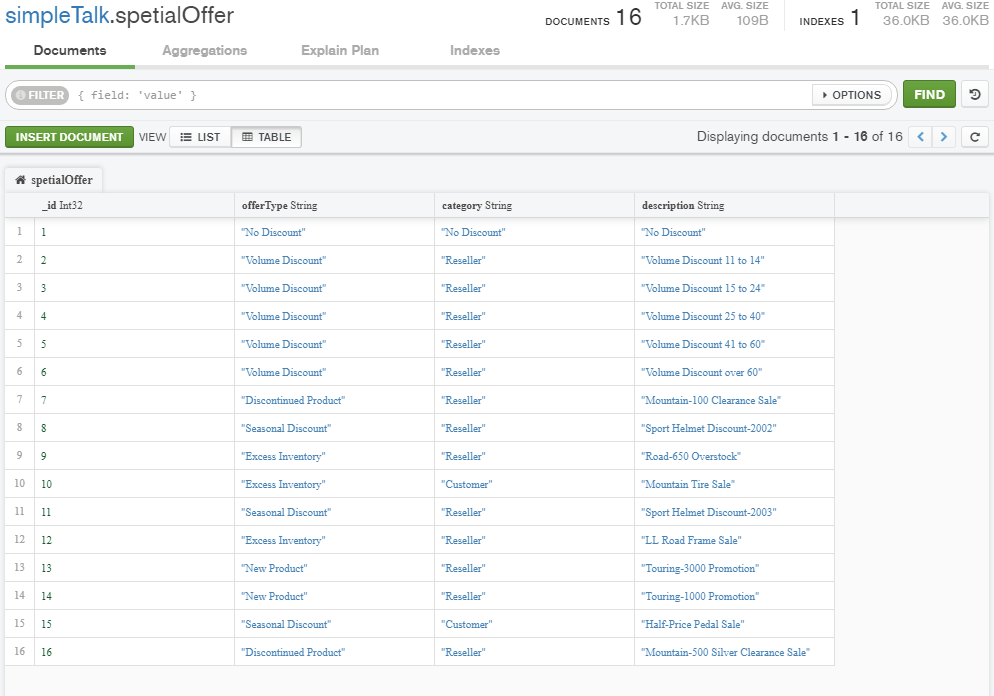
The spetialOffer collection will be used in the next section, which talks about C(reate), R(ead), U(pdate) & D(elete) operations.
CRUD Operations
To follow this section, change the startup object of the article’s solution to CrudDemo. This example demonstrates how to add, modify and, finally, delete a couple of documents in the spetialOffer collection.
As you may recall from the previous section, the spetailOffer collection has IDs from 1 to 16. If you try to add an ID that already exists, a run-time exception will occur. For example, you can define an object of type SpetialOffer, as shown in the following snippet:
var so = new SpetialOffer { SpecialOfferId = 1, Description = "Test inserting one", Type = "New Product", Category = "Reseller" }; await collection.InsertOneAsync(so); //A write operation resulted in an error.E11000 duplicate key error collection: simpleTalk.spetialOffer index: _id_ dup key: { : 1 } |
Running this will return an exception with the message shown in the snippet. Finally, try inserting a document that has an ID of 20.
In order to get the document, the Find extension of IMongoCollection is used as shown in the following snippet.
var result = await collection.Find(x => x.SpecialOfferId == IdToAdd).ToListAsync(); |
To insert many documents into a collection, you have to pass an enumerable collection of the document to the InsertMany method. InsertMany is an extension of IMongoCollection. To insert in the collection documents with ID 30 and 31, you could execute the code snippet shown below.
var so = new[] { new SpetialOffer { SpecialOfferId = IdToAddMany, Description = "Test inserting many 1", Type = "New Product", Category = "Reseller" }, new SpetialOffer { SpecialOfferId = IdToAddMany2, Description = "Test inserting many 2", Type = "New Product", Category = "Reseller" } }; var imo = new InsertManyOptions { IsOrdered = false }; await collSpetialOffer.InsertManyAsync(so,imo); |
One interesting thing to notice is the second parameter of InsertManyAsync. It is an object of type InsertManyOptions. Particularly, its property IsOrdered is interesting. When set to false, the insertion process will continue on error.
There are two kinds of updates. There is a replace extension which replaces the entire document, and there is an update extension that updates just the particular field or fields in the document. When replacing a document, first you have to specify a filter function to find the document(s) to be replaced. It is not possible to change ID during replacement. If you try to do something like that an exception will be thrown. If you specify a condition that does not match any documents, the default behavior is to do nothing.
Usually, if you want to replace one document, a snippet like following is used:
// It is not possible to change ID !!! // if we specify the condition that has no matching document default behavior is to do nothing! var so = new SpetialOffer { SpecialOfferId = IdToAdd, Description = "NEW DESCRIPTION", Type = "NEW TYPE", Category = "NEW Reseller" }; await collection.ReplaceOneAsync(x => x.SpecialOfferId == IdToAdd, so); |
ReplaceOneAsync is an extension of the IMongoCollection and represents a high order function which takes as a parameter another function – lambda expression. One of the parameters that is not provided in the above snippet is UpdateOptions. In my opinion, a better name should be ReplaceOptions because it’s in the context of Replacing. Particularly, in that class, a property IsUpsert is interesting. When specified to be true, an insert is made if the filter condition did not match any document.
When updating the document, usually you will execute a snippet like that shown below
private const int IdToAdd = 20; ----- var ud = Builders<SpetialOffer>.Update.Set("Description", "Descripton from update"); await collection.UpdateOneAsync(x => x.SpecialOfferId == IdToAdd, ud); |
In the above snippet, I’m using an example with Builders. Builders are classes that make it easier to use the CRUD API. Builders help define an update condition. This time, only part of a document has been changed. Similar to another CRUD extension of IMongoCollection is the Delete extension. For example, the following snippet will delete the document with ID 20.
var result = await collSpetialOffer.DeleteOneAsync(x => x.SpecialOfferId == IdToAdd); Console.WriteLine($"Is deleted completed : {result.IsAcknowledged}"); |
There are more extensions like FindOneAndUpdate, FindOneAndReplace, FindOneAndDelete, and so on.
There is no transaction in MongoDB, but there is the so-called atomic operation. Any write operation on the particular document is guaranteed to be atomic – not breakable. Starting with MongoDB 4.0 there is a transaction, but they are limited only for replica sets. (NOTE: A replica set in MongoDB is a group of mongod processes that maintain the same data set ).
In the article’s solution, there is an example that uses a transaction, named InsertOneWithTransaction. It is commented, but in short, in order to use the transaction, a session object should be created in the context of the MongoDB client. Then the session object starts the transaction, and the session object is passed to CRUD methods (extensions) as shown in the snippet below.
// return IClientSessionHandle object var session = SampleConfig.Client.StartSession(); // start transaction session.StartTransaction(new TransactionOptions(readConcern: ReadConcern.Snapshot, writeConcern: WriteConcern.WMajority)); try { // Note we have to pass session object await collection.InsertOneAsync(session, so); await collection.InsertOneAsync(session, so); // the transaction is commited session.CommitTransaction(); } catch (Exception ex) { // the transaction is aborted session.AbortTransaction(); } |
All examples in this section use the async stack and TPL library (task parallel library). There is also a sync stack as well, but the first one should be considered as a modern way of programming and was introduced with driver version 2.X.
In this section, I just briefly mentioned how to read and filter data. The next section will talk more about how to filter data.
Filtering
To follow this section, set up FindWithCursor as a startup object for the article solution. In this example, I query documents where
- TerritoryId equal to 1,
- SalesPersonId equal to 283,
- Total Due greater than 90000
- and limiting the number of documents to be returned to 5,
- Sorting the result ascending by Due Date.
The task is accomplished by utilizing Find, an extension of IMongoCollection. Find is defined as shown in the image below.

It returns an IFindFluent, which is a context type for method chaining in searching documents. Other methods like Sort, Limit, Project in context of IMongoCollection return IFindFluent.
Find takes two parameters, a lambda expression and an object of type FindOptions. Besides other properties, FindOptions defines the batch size. By using Find you could get a result in chunks. If you limit the number of the document to 5, a total of 3 batches is returned to the client. The complete code is shown in the image below.

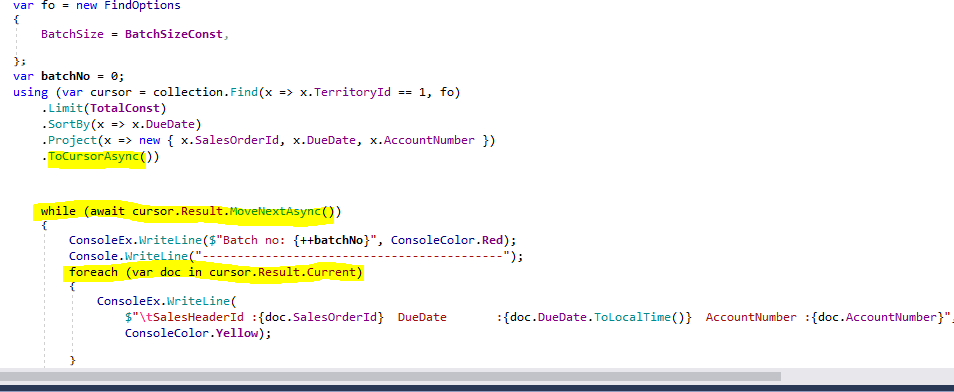
Getting the next batch is accomplished by invoking cursor.Result.MoveNextAsync. Inside that batch, you can iterate through the documents by processing cursor.Result.Current. The benefit of that approach is that if you get a large number of documents as a result, you can process them in batches, which will use less memory.
There is an option to get all results by invoking ToListAsync(). In that case, all returned documents live in memory, and there is an option to process the cursor using ForEachAsync as shown in the image below.

Invoking cursor.ToString()will return a MongoDB shell query. I did not find a proper way to get the query plan in the code. It was possible before the 2.7 release of the .NET driver. In the article’s solution, there is an example of how to get the query plan from the code. The example is named Explain and is located in the Filtering folder.
To get the execution plan, you could save the query text and execute in the context of the Mongo shell. I saved the query in a file QueryUsingCursor.js.

So, if you append explain() before find, you will be able to see the execution plan.
Explain receives a parameter that describes what the type of output should be. The parameter specifies the verbosity mode for the explain output. The mode affects the behavior of explain() and determines the amount of information to return. The possible modes are queryPlanner, executionStats, and allPlansExecution.
The example uses executionStats. The plan is shown in the image below.
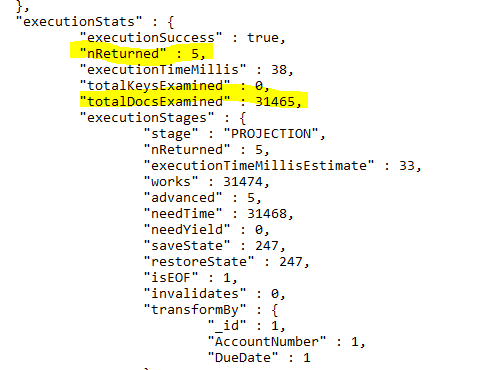
As you can see, to return five documents, you have to process all the documents in the collection. That is the part when the index comes to play. To create an index, you should execute a command shown in the image below, in the context of the simpleTalk database.

The rule in index creation requires a field that participates in filtering first and then fields that are included in sorting.
An index could be created in the foreground which is the default. What does it mean? MongoDB documentation states: ‘By default, creating an index on a populated collection blocks all other operations on a database. When building an index on a populated collection, the database that holds the collection is unavailable for reading or write operations until the index build completes. Any operation that requires a read or writes lock on all databases will wait for the foreground index build to complete’. This does not sound good.
For potentially long-running index building operations on standalone deployments, the background option should be used. In that case, the MongoDB database remains available during the index building operation.
To create an index in the background, the following snippet should be used. There is no need to create the index again. This index is small, and it’s creation takes a few seconds.

In MongoDB, there is no need to rebuild indexes. The database itself takes care of everything. Great!
Let’s get back to the main topic about the query plan. After the index is created, examine the execution plan again.
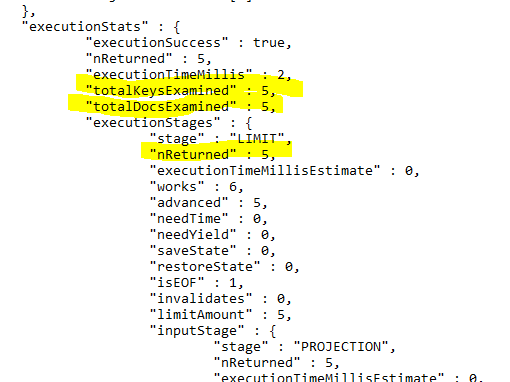
As you can see, highlighted with yellow, the execution plan looks much better now. Only five documents are examined.
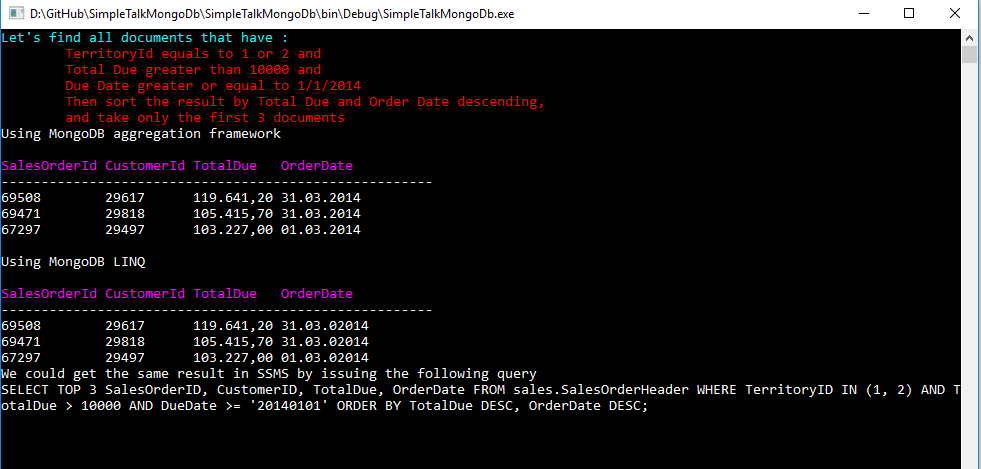
Another example located in the Filter folder named FilterHeader uses the MongoDB aggregation framework to query the document, which is the next section. To explore this example, change the startup object to be FilterHeader, and you will receive the output as shown in the image below.
Aggregation
Aggregation operations process some input data, in the case of MongoDB, documents and return computed results. Aggregation operations group values from multiple documents together and can perform a variety of operations on the grouped data to return a single result. MongoDB provides three ways to perform aggregation:
- the aggregation pipeline,
- the single purpose aggregation methods,
- the map-reduce function.
I will write mostly about the first by introducing a common problem in the SQL world that is called TOP n per group. The single purpose aggregation methods are briefly mentioned in the first example that connects to MongoDB when Count was introduced. Map-reduce was the only way to aggregate in prior versions of MongoDB.
In MongoDB, there is a difference when querying embedded documents such as sales details, or the main document. In the first case, the unwind operator must be introduced. So, I decided to include the same problem twice.
The first example finds the top N (one) customer per territory that has the greatest Total Due and then limits the result to those territories and customers where the sum of Total Due is greater than the Limit (a defined number). The result should be sorted on Sum of Total Due descending order. The second example does something similar with special offer and products.
There are a couple of ways to accomplish this task in SQL. In the article’s solution, I include two T-SQL scripts, located in TSQL folder. One for querying the header table named QueryingHeader.sql, and one for querying the detail table named QueryingDetail.sql.
I provided three possible ways to solve the problem in T-SQL, by using T-SQL window functions and the APPLY operator.
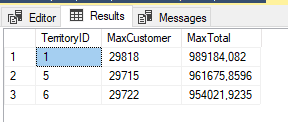
Both results for querying the header and the detail table, are displayed in the image below. In the first case, the limit is 950.000, and in the second case, the limit is 200.000.
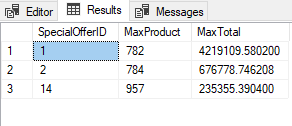
To see how is the problem solved in MongoDB, switch the startup object of the article’s solution to be AggregationSales.
In the class, there are three ways how to accomplish the same task.
- Using IAggregateFluent
- Using LINQ
- Parsing BsonDocument ( the MongoDB’s shell-like syntax )
The first way is shown in the snippet below.
var result = collection.Aggregate(aggregationOptions) .Group(x => new { x.TerritoryId, x.CustomerId }, g =>new { TerritoryIdCustomerId = g.Key, TotalDue = g.Sum(x => x.TotalDue) }) .SortBy(x => x.TotalDue) .Group(x => x.TerritoryIdCustomerId.TerritoryId, g => new { TerritoryId = g.Key, MaxCustomer = g.Last().TerritoryIdCustomerId.CustomerId, MaxTotal = g.Last().TotalDue }) .Match(x => x.MaxTotal > Limit) .Project(x => new { x.TerritoryId, MaxCust = new { Id = x.MaxCustomer, Total = x.MaxTotal }, }) .SortByDescending(x => x.MaxCust.Total); var queryToExplain =query.ToString(); var result = await query.ToListAsync(); |
First, you have to notice that everything in the snippet above is strongly typed!
Then, you should notice that Aggregate is an extension of the IMongoCollection. Aggregate returns a type of IAggregateFluent<TDocument>. All other operators like SortBy, Group, Match, Project, etc. do the same thing. They are extensions of IAggregateFluent and return IAggregateFluent<TDocument>. This is the how methods chaining is accomplished which is really one of the characteristics of the fluent API. So, again, I will repeat the API is easy to use and difficult to misuse, and every method name is self-documenting.
Take a look at IAggregateFluent, in the image below. Surrounded with red is a read-only property named Stages.
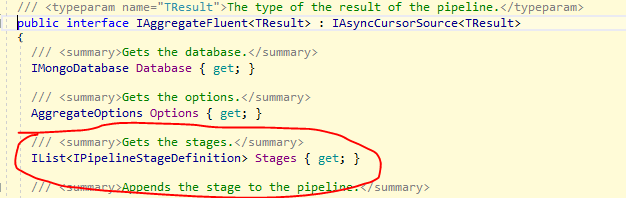
It represents every operation performed on the IMongoCollection. If you set the breakpoint on the line
var queryToExplain = query.ToString(); |
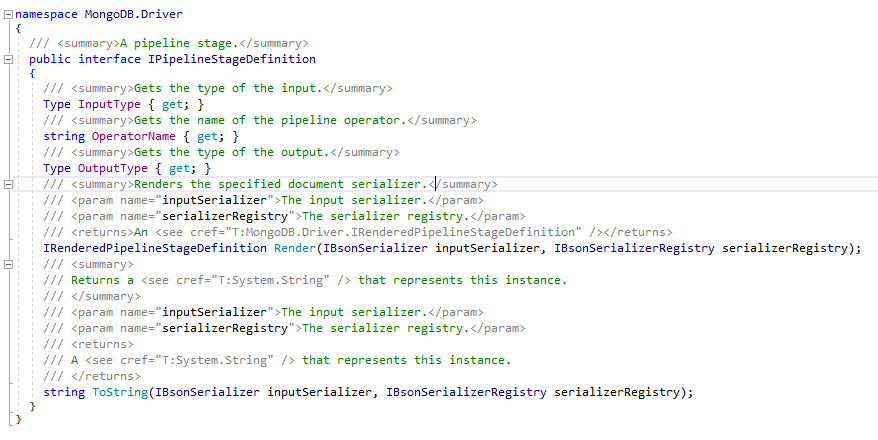
And try to examine the query variable, you will notice that there are six stages defined as shown in the image below.

Every stage has the type of IPipelineStageDefinition and has the Input and Output type as well as the shell operator name as shown in the image below. The .NET driver is perfectly mapped to MongoDB shell!
To capture the whole query, execute query.toString();. The query is saved in the article’s solution in a file Query.js, located in Aggregation folder.
The second way to accomplish the same task is to use LINQ like syntax. To do that, the MongoDB.Driver.Linq namespace must be included. This time the query looks similar like is shown in the snippet below.
var pipeline2 = collection.AsQueryable() .GroupBy(z => new { z.TerritoryId, z.CustomerId }) .Select(g => new { TerritoryIdPlusCustomerId = g.Key, TotalDue = g.Sum(x => x.TotalDue) }) .OrderBy(o => o.TotalDue) .GroupBy(o => o.TerritoryIdPlusCustomerId.TerritoryId) .OrderBy(g => g.Key) .Select(g => new { TerritoryId = g.Key, MaxCustomer = new { Name = g.Last().TerritoryIdPlusCustomerId.CustomerId, g.Last().TotalDue } }) .Where(x => x.MaxCustomer.TotalDue > Limit) .OrderByDescending(x => x.MaxCustomer.TotalDue); |
As you see this time, the AsQueryable extension is used. This is an extension of the IMongoCollection and returns an instance of IMongoQueryable. Every method also returns IMongoQueryable, and this is the how method chaining is accomplished, this time with LINQ style syntax.
Method names are similar to IAggregateFluent. Instead of Group, there is GroupBy; instead of Sort; there is OrderBy; instead of Project, there is Select; instead of Match, there is Where, etc.
You can also use SQL like syntax to accomplish the same task, as shown in the snippet below.
var pipeline = from o in from z in collection.AsQueryable() group z by new { z.TerritoryId, z.CustomerId } into g select new { TerritoryIdPlusCustomerId = g.Key, TotalDue = g.Sum(x => x.TotalDue) } orderby o.TotalDue group o by o.TerritoryIdPlusCustomerId.TerritoryId into g orderby g.Key select new { TerritoryId = g.Key, MaxCustomer = new { Name = g.Last().TerritoryIdPlusCustomerId.CustomerId, g.Last().TotalDue } }; // filter by limit and apply descaning order pipeline = pipeline.Where(x => x.MaxCustomer.TotalDue > Limit).OrderByDescending(x => x.MaxCustomer.TotalDue); |
There is a method to pass BsonDocument to the pipeline as well. In the solution the method name is UsingMongoShellLikeSyntax.
The result from all three methods is displayed on the console output and shown in the image below.
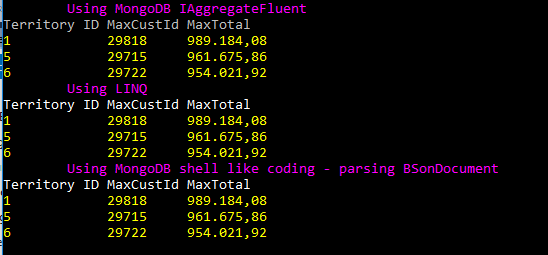
At this point, I have to make two digressions. First, I briefly describe the lookup operator and then the unwind operator.
As you recall when I write about schema design, the preferable way to work with data is embedded documents, but, there is a situation when you have to join data from a different collection. In such a situation, the lookup operator will help you.
Switch the solution’s startup object to be SampleLookup located in the Aggregation folder. This example creates two collections, one that contains names and the other that contains the meaning of the names. Of course, the only reason I am doing like this is to show how the lookup operator works.
If you use the peek definition of Visual Studio, it will show what Lookup to expect, as shown in the image below, surrounded with red.

The first Lookup is an extension of the IMongoCollection. It executes in the context of the collection and requires a foreign key collection as the first parameter, then the local field on which relation is established, the foreign field that composes the relation, and finally the result type. Unfortunately, the result type cannot be an anonymous type (or I did not discover how to be anonymous?). As always is expected that from the foreign collection will be returned more than one element, so, the operator always expects an array to be returned.
In this case that looks like the code shown in the snippet below.
var result = await colPerson.Aggregate() .Lookup<Person, NameMeaning, LookedUpPerson>(collNameMeaning, x => x.FirstName, y => y.Name, x => x.Meanings ).ToListAsync(); |
And the result is displayed on the console window as shown in the image below.

The MongoDB documentation states following for unwind: Deconstructs an array field from the input documents to output a document for each element. Each output document is the input document with the value of the array field replaced by the element.
That means if you want to aggregate on embedded documents, you have to promote them to the top level. Here’s an example. If you would like to aggregate sales details, an array of documents embedded in the main document, you have to use unwind. The example of the basic usage of unwind operator could be found in the SampleUnwind solution file.
If you take just one document in the adventureWorks2016 collection by applying Limit(1) and after that apply Unwind on the Details field, the output will produce as many rows as the number of embedded documents that are in the Details fields. The source code to accomplish such a task is displayed in the snippet below.
var collection = SampleConfig.Collection; var result = await collection.Aggregate().Limit(1) .Unwind<SalesHeader, SalesDetailHelper>(x => x.Details) .Project(x=>new {x.Details.SalesOrderDetailId}) .ToListAsync(); foreach (var example in result) { Console.WriteLine($"{example.SalesOrderDetailId.ToString().PadRight(10)}"); } |
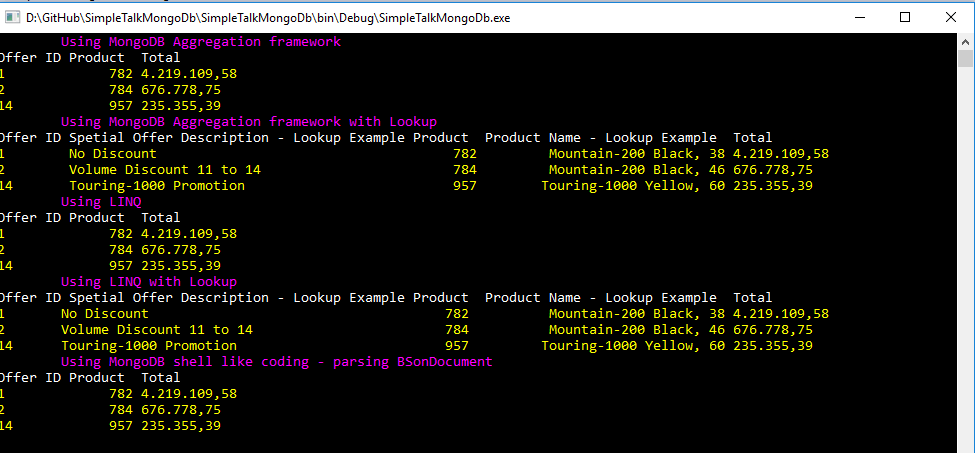
And finally, make AggregationUnwind the startup object of the article’s solution. There are five tests in this class. Two of them are accomplished by using LINQ, two of them by using IAggregateFluent and one by parsing BsonDocument as shown in the image below. The result is always the same and equal what is returned by executing the T-SQL script in SSMS.
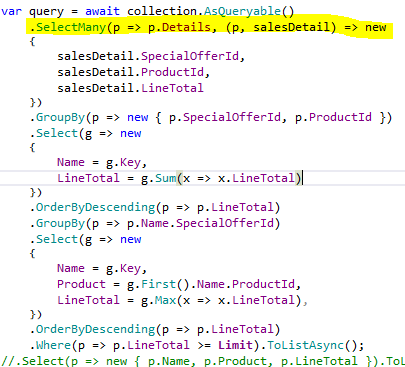
I found that using LINQ style coding is extremely easy. Unwind in LINQ style syntax is simple SelectMany for joining, as shown in the image below highlighted with yellow.
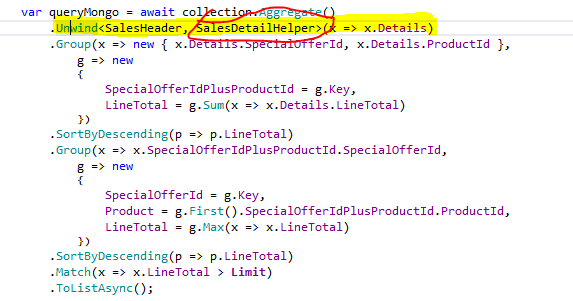
Using IAggregateFluent is a little bit difficult, especially when working with Unwind. Unwind has three different overloads. One is obsolete, one uses BsonDocument as output, and that means breaks strongly typed writing, and the last one is a little bit confusing.
I expected that the result of the UnWind operation should be an anonymous type. Unfortunately, it should be a concrete type of class that is defined. It is shown surrounded with red on the image below.
And SalesDetailHelper is defined as shown in the image below.
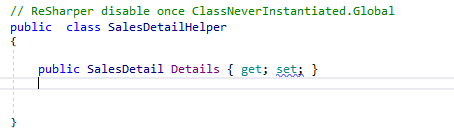
Pretty simple, but on the other hand still a little bit annoying. It would be nice if you could use an anonymous type.
The aggregation framework has limitations. The stages have a limit of 100 MB of RAM, per stage. If a stage exceeds the limit, MongoDB produces an error.
Funny thing about this limitation is that I was unable to find how much memory is used per stage. Thanks to, the moderator in MongoDB forums, I finally found out that there are no possibilities to get that information. It will be available in the next release. As a drawback for such a situation, you could pass an optional parameter allowDiskUse to true to enable writing data to temporary files, as in the following example:
db.adventureWorks2016.aggregate( [ { $project : .... }, { $sort : ... } ], { allowDiskUse: true } ) |
Another limitation is the ability to use indexes. I was trying to avoid the collection scan when using the group operator. Unfortunately using indexes with the group operator does not work. The operator always performs the scan. Furthermore, if in the aggregation pipeline, any stage cannot benefit from index usage, all stages that follow also will not use indexes.
Besides that, everything seems to be excellent.
Summary
There is no doubt, MongoDB is a great product. Although I still search for some features that exist in the SQL world, my general impression is excellent. I can say the same for the .NET driver. It is easy to use, every method (extension) emphasizes the intent of the code, enables you to write less code, and everything is where you expect to be.
Although the article moves at the speed of light, I hope that the article with article’s solution would be enough to encourage readers to start exploring MongoDB and the .NET driver.